by Les Saidel - June, 2011
Perhaps nothing intimidates beginner bakers more than braiding. The convoluted instructions of "folding braid 5 over 3 and under 2 ....." seem to bounce off the brain without penetrating.
The truth is that braiding is an advanced baking technique and one that will require some effort and dedication, but it certainly is not rocket science. Remember this little fact: As far as I know, nobody has yet invented a bread braiding machine. This means that all challahs in bakeries around the world are braided by hand, usually using low cost labour. If they can master it, surely you can too.
The secret is to study braiding hands-on only, not in theory. Sitting and reading a book on Shabat and trying to memorize the technique in your head is a waste of time. You need to actually hold the braids in your hands and make the twists, to let it sink in. In the case of braiding it is definitely the hands teaching the brain and not the other way round.
Most braiding techniques are a series of repetitions. Once you master the first twist or two, after that it is just repetition, again and again, the same thing. The trick is to master the beginning procedure, once you have that, the rest becomes automatic.
To learn a braiding techinique for the first time there are two ways - practical demonstration and written tutorial. We routinely conduct baking workshops in Saidels Bakery in a number of topics, one of which is Challah Making. You may enrol for one of these workshops and learn the technique by practical demonstration. The other alternative is to learn from these written pages - it's a little more difficult, but definitely doable.
Before we get started, a short introduction and a few tips to make your braiding experience more pleasant.
A braid is a cylindrical (usually tapered at the ends) strand of dough. You can braid challahs with as little as one braid and from there move up to 2, 3, 4 .... etc. Actually the sky is the limit and it is possible to make breads of 30 braids or more. However for practical purposes we will confine our article to up to 6 braids, which usually covers most types of challahs.
One of the most important parts of braiding is correctly preparing the braids before you begin. If you take a little time and extra effort to create your braids correctly and symmetrically, you will be rewarded with an easy braiding experience and a breathtaking end result. This first part of correct braid construction involves scaling. If you are using 2 or more braids try to portion the dough into equal portions for each of the braids. If one is substantially thicker or longer than the other, your work will be that much harder and the result will not be symmetrical.
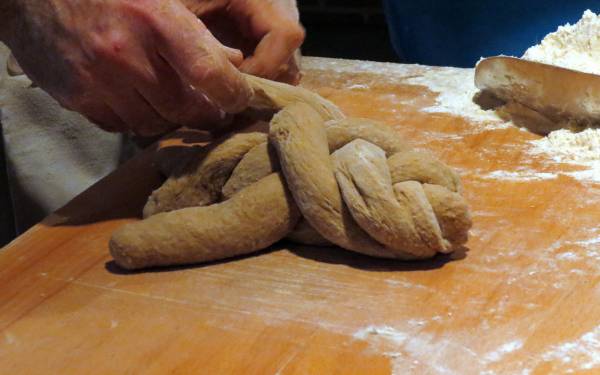
Once you have more or less equal sized clumps of dough, roll them on your work surface until they are mostly cylindrical and slightly tapered at the ends. As you roll, try get the braids smooth, without any fissures or seams, or this will adversely affect the appearance. It is very difficult to completely eliminate any seam in the braid, so when done, position the braids with their seams facing downward, smooth side up, so that they cannot be seen. Next, lightly flour each braid (don't overdo it). There is nothing worse than trying to braid when the braids stick to each other.
Finally arrange the braids together (as shown in the following diagrams) to begin the braiding.
You are now ready to go.
One Braid
This techniques is usually used for large round challahs, or for challah rolls.
One Braid Method 1:
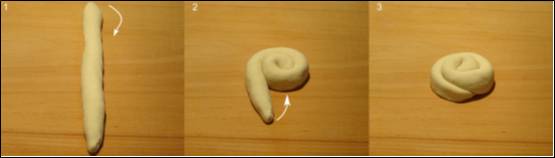
1. Lay the braid out before you and starting at one end, begin coiling the braid in a circular spiral until you have reach the other end.
2. Take the outer end and tuck it underneath the round challah to anchor it.
One Braid Method 2:
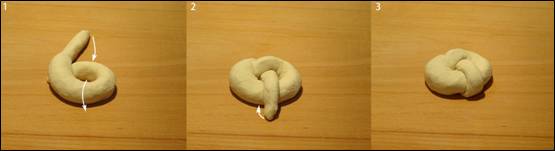
1. Pick up one end of the braid and twist it over the other in the shape of the number 6.
2. Tuck the longer end under and up through the hole of the 6 shape.
3. Tuck the end underneath and out of sight.
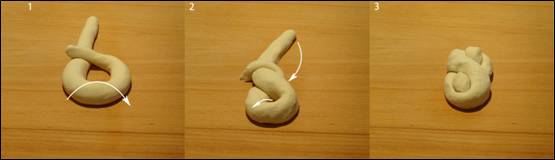
One Braid Method 3:
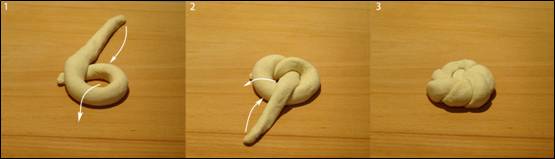
1. Lay the braid out horizontally before you (as in Method 1 above) and form the shape of a number 6.
2. Tuck the longer end under and up through the hole of the 6 shape.
3. Repeatedly tuck this long end under and up through the hole and leave it protruding from the center like a small bulb. Hide the other end under the roll
One Braid Method 4:
1. Lay out the braid and form into the shape of a number 6 (this time with the loop resting on top and not tucked below as in methods 2 and 3).
2. Twist the bottom portion to create a figure 8 pattern.
3. Tuck the long end down and up through the bottom hole of the figure 8. You now have both ends protruding slightly from both loops.
Two Braids
Two Braids Method 1:
This creates a round rosette shaped challah/roll.
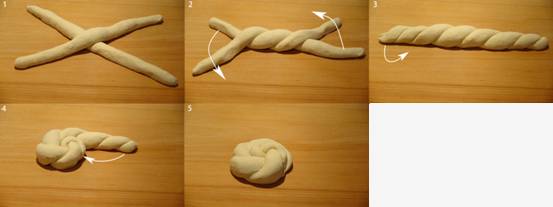
1. Lay the two braids out as shown.
2. Continue twisting them as shown until they are completely twisted, end to end.
3. Coil the twisted braid in a spiral rosette and tuck the remaining end below the dough.
Two Braids Method 2:
This creates a teardrop shaped challah.
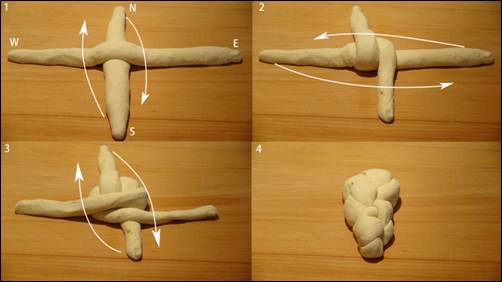
1. Criss cross the braids as shown. Bring south to north and north to south, with south passing to the left of north as they cross.
2. Bring east to west and west to east, with east passing above west as they cross.
3. Repeat this process until all the dough is used. Press the remaining ends together. There should be a distinct taper creating a teardrop shape.
Three Braids
A three braid challah is the simplest classic challah braid and may be used for challahs or rolls.
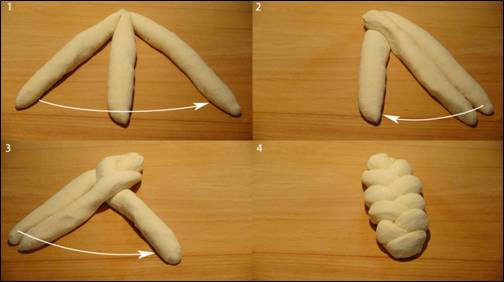
1. Lay out the threee strands as shown. Cross the outer left strand over the middle strand, placing it adjacent to the right strand.
2. Cross the outer right strand over the middle strand and place it adjacent to the left strand.
3. Repeat this process until al the dough is used. Join the edges on both ends and if need be slightly tuck them under the main mass to create a smooth finish.
Four Braids
The four braid challah is one of the most attractive shaped challahs and is typified by its height. Starting with the four braid we will number each braid so as not to lose track. This braid may seem complicated, but once you have caught on, it is extremely simple.
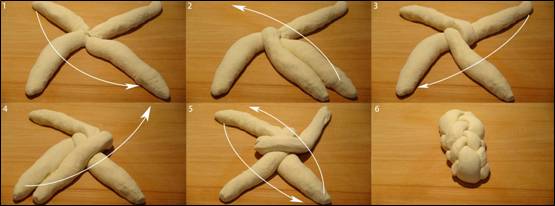
1. Lay out the braids in an X configuration. Move the top left braid to the inside of the bottom right braid.
2. Move the bottom right braid to where the top left braid used to be.
3. Move top right braid down to the right of the bottom left braid.
4. Move bottom left braid to where thetop right braid used to be.
5. You now have a similar X configuration as before. Repeat steps 1-4 until you run out of dough.
6. Pinch together the edges on both ends and if need be slightly tuck them under the main mass to create a smooth finish.
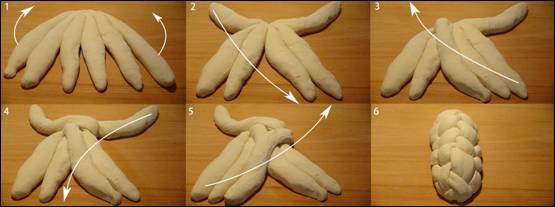
Five Braids
This is by far the most complicated (even more so than the 6 braid), but the result is stupendous, a sea shell shaped challah.
1. Place the braids as shown in 1 (2 braids on the left, 3 on the right). Lift the left most braid and move the right most braid underneath it, all the way to the left.
2. Lay down the raised left braid in the middle space.
3. Twist that braid with one immediately to the left of it.
4. You now have the same original configuration as in 1. Repeat steps 1-3 until you run out of dough
5. Pinch together the edges on both ends and if need be slightly tuck them under the main mass to create a smooth finish. Rotate the challah slightly clockwise to get a seashell shape.
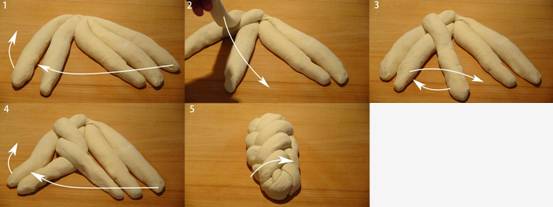
Six Braids
Six Braid Method 1:
One of the easiest braids to make, creating a flatter shaped challah.
1. Arrange the braids as shown - 3 on the left and 3 on the right. Bring the leftmost braid to the middle alongside the innermost right braid.
2. Bring the right braid to the midde, alongside the innermost left braid.
3. Repeat steps 1-2 until you run out of dough.
4. Pinch together the edges on both ends and if need be slightly tuck them under the main mass to create a smooth finish.
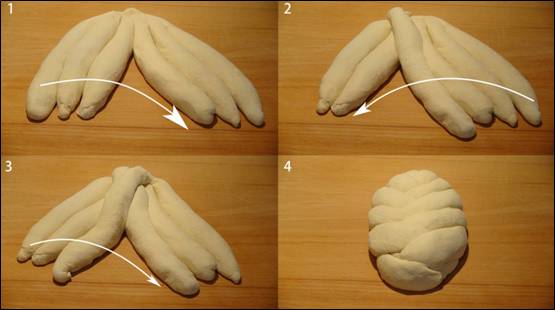
Six Braid Method 2:
This is very similar in concept and appearance to the 4 braid.
1. Arrange the braids as shown with 2 arms and 4 legs
2. Move the top left "arm" braid down to the middle alongside the innermost right braid.
3. Move the right most "leg" braid up to the left "arm" position.
4. Move the top right "arm" braid down to the middle alongside the innermost left braid.
5. Move the left most "leg" braid up to the right "arm" position. You now have the same starting position as in 1. above.
6. Repeat steps 1-5 until you run out of dough.
7. Pinch together the edges on both ends and if need be slightly tuck them under the main mass to create a smooth finish.
That's it for now. All you need to know about braiding challahs. Don't try absorb it all at once. Start with one method, perfect it and practise, practise, practise until it is embedded in your neural patterns. Then start on another and repeat the process. You should eventually become like me, that if someone wakes me up at 3 in the morning and asks me to do a 5 braid, I could do it with my eyes closed.
Les Saidel
© Copyright. All rights in the above articles are reserved to the author Les Saidel.
No part of this website or the above articles may be transmitted in any form or by any
means without permission in writing from the author.
 972-50-7202521